
DIY – How to Crochet Your Own Fly Bonnet
Epic DIY post of epicness today. We all know my fascination with bonnets, but I get sticker shock every time I look at one… even the more reasonably priced ones. So I did what any rational horse lover would do, and I asked my mother in law to teach me to crochet.
She gave me a tutorial, which you can re-create by going to youtube and watching videos. For my bonnet, I used the single crochet stitch the entire time. Search that on youtube, and you’ll be golden.
So after I learned my stitch, my mother in law suggested I make pot holders to practice… but I said horse hats or bust! The next day I went to the fabric store and bought 3 yarns and fabric for the ears. That night I started to crochet and immediately realized my yarn was way too fuzzy.
If you want to crochet a horse bonnet, you need to get cotton yarn. Mercerized cotton yarn is even better. Once I ordered the right yarn, we were ready to begin.
Since I didn’t work off a pattern, I held one of my KL Select bonnets up to my DIY one to try and get the sizing right. I started with 28 crochet stitches at the area that goes under the crown piece of the bridle.


After I got a few rows in the beginning, I added a stitch on either side of the back of the bonnet. This way, I’m moving out to allow more room for where the ears will eventually go.

When I finished the piece behind the ears, I “tied off” and knotted the work up. Next, I moved to the edge and crocheted the area to the right of his right ear. Then, the area to the left of his left ear. Finally, the middle area leaving an open space for each ear. After each section of single crochet stitch, I tied off and then tied on to connect the sections. Again, youtube is your friend here.

Once I finished connecting all the pieces for the ear holes, I then did a row all the way across. You have to be careful to count the number of stitches that go on top of the ear holes. If you do too few or too many that doesn’t match the opening you left, the bonnet will be warped.
Once the ear holes were closed on, it was time to think about the front face flap of the bonnet. This is basically just rows of reducing your crochet stitch by one each row. I chose to make a square flap, so once I got far enough down I created my square “bottom” with 6 crochet stitches across. Remember, you’ll be adding trim eventually so make things a bit more narrow than you want them to be once you add trim.


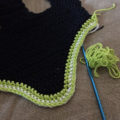
When the base is done, it’s time for the trim… which is the fun part. Now during making the base, you’re pretty much crocheting across the piece in rows. For the trim, what I did was turn the piece and start crocheting around the edge. You’re still doing the same stitch, but it’s in a different direction.

For my trim, I first did a single crochet all the way around the bonnet. That didn’t look very thick, so I added an extra line. I don’t love the way you can see the intermixing between the silver yarn and the navy yarn. I know there are lots of different crochet stitches and trims, so I may just need to learn a better one here to achieve the look I want.

Once I did one two rows of silver around the base, I decided to add a single row of white. Since I was using the white acrylic yarn, it was much thicker (and fuzzier) than the navy or silver. Gives a different look, but I think I liked it… just need a non-fuzzy version when I buy more materials in the future.

With the white, the crochet part of my bonnet was done. Next I needed to add the ears! For the ear fabric, I bought lyrca (stretchy swimsuit fabric) in a dark navy to match my base. I again used the KL Select bonnet as a template since the ears fit Simon, but I basically cut a folded half circle in an ear shape.

Then I sewed the ear together, leaving the bottom open. Note: make sure you sew with the off side of the fabric facing you.
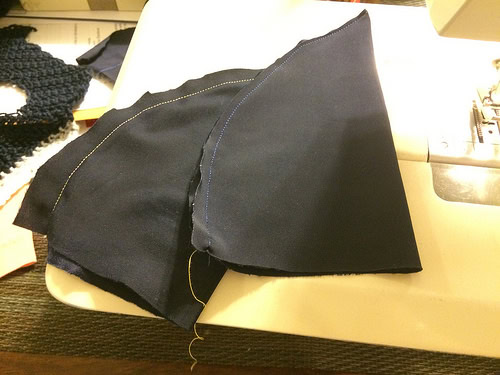
Next turn the ear inside out so the stitches are hid and the shiny side is out. Poke that ear through the bonnet holes, so the shiny/finished side is facing the “good” side of your bonnet.

Now carefully fold a small amount of ear fabric to a small amount of your bonnet crochet. What I did is fold a short straight line, sew it, and then re-adjust. Be careful so you don’t end up sewing your bonnet together!

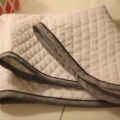
Once you go all the way around, your bonnet will look like this from the side that touches your horse.

And then you have ears!

At this point, the bonnet is ‘finished’ unless you want to add any fancy trim or sparkles. I decided to wait until I put it on Simon to verify the fit before I got crazy with the add ons.

Up close, you can see some irregularities in the stitching and a little lack of straightness here or there. For my first time making one I was pretty thrilled though, and figured it would look okay from a distance. The next day, I went to try it on Simon.

The overall verdict? A bit too small. I want to make another one that goes further down to his eyes, longer flap, and a little bit more on either side of his ears. This was certainly doable and didn’t look awful, but I figure there’s no point settling when I can just pull the crochet out and re-do the bonnet to fit a bit better.

These don’t look as nice as some of the high end custom bonnets, but I’m not sure I care. With some sparkles and some cording (and a better fit), I don’t think you’d know the difference! Plus I can make as many as I want… now I need more saddle pads. 🙂
Obviously it’s not a perfect tutorial, but I had a hard time finding documentation out there so I figured this would be a good start! If you have any questions I will do my best to answer then (or find youtube videos for you to watch).


61 thoughts on “DIY – How to Crochet Your Own Fly Bonnet”
WOW! Damn, that looks fantastic!!! Even if Elliot isn’t impressed, it looks great on Simon!
I agree, you need more saddle pads for matchy-matchy. 🙂
This is incredible!!! I now really want to try making bonnets! Do you have links to good youtube videos to watch? I don’t know when in my ‘spare time’ I’m going to learn to crochet though, haha.
Yes! I’ll post some videos when I’m back at a computer.
Here’s a good starter video – https://www.youtube.com/watch?v=wgVOkQcf5qw
How did you do the crochet pices around the ears? Did you do seperate pieces or…?
By the way, fantastic work!
Ugh, I have been so intimidated to try a bonnet! Props to you! It looks great and, really, I’m sure the irregularities are only obvious to you because now your eyes have been trained to see stitches.
Great job!
That is a great first project! When I learned to crochet my first pot holder was all kinds of warped and backwards knotted throughout. You have inspired me to try something like this myself…hello Christmas gifts for barn friends!
Damn girl! Nice job! I agree that one is a little too small for Simon, but it looks freaking awesome! 🙂
I see an Etsy store in your future …
Haha, I have seriously considered learning to crochet for this very reason. Maybe you can have a side business once you work out the kinks? What is the time investment like?
PS If you don’t want to redo that bonnet, I have a little bay horse with a teeny head that it would totally fit on.
About 8 hours total, but I got much faster as I went along. Next one will be much quicker I imagine!
Way to go! I think it looks great considering you had no real instructions!
Your craftiness is much more successful than my own! It looks great!
Props girl!
Looks amazing – love the colours on Simon ☺
Holy smokes- that looks like a massive undertaking! Kudos to you for taking on the challenge- it looks fab!!!
THIS IS AWESOME.
I need to get on the crochet boat.
Impressive!
Love me some homemade horse hats. Luckily, I don’t have to stitch them myself LOL
Ahhh, very cool! I have crocheted many, many things in my life but I’ve never gotten around to doing a bonnet. I don’t have a sewing machine, so doing the ears would be tricky.
What size cotton yarn did you use – just the basic Sugar’n’Cream? I have a bunch of that kicking around. How much did it end up taking?
I used a “light weight” cotton yarn that was 5.5 gauge. It was nice for the bonnet, but I think something a bit thicker would look good on the trim.
That looks great! And not TOO complicated!
When I was in high school, crocheting was very much the thing to do. (Um, it was rural Tennessee? That’s the only explanation I have.) I learned how and crocheted my fair share of pot holders and once attempted a scarf; maybe muscle memory will kick in and I’ll remember if I start on a fly bonnet!
You should definitely do a bonnet!
Stop it! You’re giving me ideas…
I am so not a crafter. Props to you for sure, this makes my head hurt just looking at it! I have no patience.
Really cool! Well done. I gave up crocheting when I was ten I think. I hated missing stitches and not getting it too look right. But I think for a first attempt your’s looks awesome. Each try will get better.
Wow! Very impressive! I have to admit that I don’t really like bonnets on my horse because his head is so fat and they look stupid on him. But if I could make my own, I could actually make it to fit. This is good inspiration!
Haha, I *loved* the photo of the fly bonnet on your dog! So adorable. 🙂
I would be happy to share my bonnet pattern & tips. Mine are not yet perfect but each one gets better. Just ask Tracy, my totally non-crafty daughter.
Your bonnets look great! Tracy showed me a picture 🙂
any chance youve still got your pattern? would love to make some bonnets!
Fantastic! I had thought about crocheting my own bonnet but never actually acted on it.
To do the trim are you crocheting through both loops of the outside stitches or only one? I need to check the blanket I was working on but never finished (I got distracted by crocheting teddy bears and other stuffed toys), but I’m pretty sure you can hide the interlacing pretty effectively by working only on the “back” loop (in this case the side that will be touching his face) of each stitch. The pattern for the blanket had me doing that, and I think that’s what made the lines of color on the front so even.
Where did you order your yarn from?
I put it through both loops of the outside stitches. I will try just one next time and see how that looks, thanks for the tip!
I was a nerd and ordered my yarn off Amazon to get free shipping 😀
I do a row of single crochet the same color as the bonnet base color for the first row around the edge. This smooths out any jaggedy edges that can result from decreasing stiches, and gives a nice base to crochet your fancy edging into. Look real close at a photo from the delacouer website & you can see that is what they do.
What a great job! I would love to try but it would likely look like a child made it 🙂
That turned out really nice!
Too funny! I’m halfway through my first crocheted bonnet. I’ll post a photo when I’m done.
Hi, I have been looking for a pattern for sometime as I would like to make some for a non profit org ‘Prince Fluffy Kaleem’.
Would you mind if I used your tutorial?
Many Thanks
Kerry
What size crochet hook did you use for this?
Your bonnet looks great Lauren! I am in Australia, so am struggling a bit trying to convert the hooks and particularly the yarn; I haven’t seen anything locally that looks like the yarn used for bonnets so would you be able to recommend yarn or yarns I can look at and think “oh that looks the same as XYZ”
you need mercerized cotton or cotton yarn. you can also use embroidery string (6 stranded)
How big is it form side to side? And how to do yo make the ear holes? I’m so confused. Did you make separate pieces?
hi, I was just wondering how much space you left for each ear hole and how big the first row at the top of the front flap (next to the ear holes) was?
I actually decided to do this for my sister’s horse (I take care of him) and this was the only good example I could find to go off of (I’ve been working on blankets and such for quite a few years so I wanted to see if I could do something more complicated *as far as changing stitches and measuring it out beforehand in inches*). I completed it (hand sewed on the ears instead of using the machine, it doesn’t like me) in white, orange, and black with black cotton for the ears. Homer put up with me checking the size of the ear sleeves on him with so much grace. I got pictures of him wearing it (managed to make the ears a little long), despite being told he wouldn’t wear it. I feel quite accomplished and I am so glad you put this up (because it was the right size across the back and everything).
By far the best tutorial on how to make fly bonnets. The ones I have seen so far were very intimidating and reminded me of school. This one is great: I love the step by step, with great photos, and comments that help the Bonnet-Student understand how it is done. The spaniel is too much! I hop he got a few treats.
Could you possibly write up how many stiches you did and how many rows and such. I like yours the best out of all the ones I’ve seen.
Hi! This is fantastic!!! Can you help me pls? I don’t know the sizes… How big is the pony, cob and full? (Sorry for my very bad english!!!! 🙁 )
wow i wish i was as talented as you <3 it looks amazing!!
I am so impressed. I’ve gotten pretty good at crocheting in the last few months, but not so much that I feel like I can come up with a pattern from scratch. Nice ear bonnet!
What size is the bonnet (cob, full, pony)
How long did his take for you to make?? Its really impressed!!
Great one! I’ll be sharing! Thanks so much. You make it look easy.
Kudos! Don’t have and have never had horses, but love animals and have seen them annoyed by flies and such. What a blessing you are to Simon to go the the time and trouble to make this special for him and you did an awesome job!
I must say you have very interesting posts here. Your content can go
viral. You need initial boost only. How to get massive traffic?
Search for; Murgrabia’s tools go viral
How did you continue your work? I am a little confused I can’t fine a video on how to do that! I really need help! Please reply as soon as you can! So far the easiest t
I admire your patience, but it was worth the effort!
Hi. Just wondering what are the dimensions for the material for the ears please?
Thank you
Your DIY fly bonnet project has inspired me to try to do the same! What size crochet hook did you use and is there a certain thickness of crochet thread I should get? I found some size 10 mercerized cotton thread but it seems awfully thin! Appreciate your help!
la parte de atras como va estoy empezando y no lo he pillado .Por cierto me ha encantado muy buen trabajo
Hahahaha I finally learned to chrochet and started one for my little pony man. Looked for a pattern online and yours is the 2nd one that popped up! Lol
I may need to find another color yarn for the trim, but he’s going to look great in it with his harness.
I have noticed you don’t monetize your blog, don’t waste your traffic, you can earn additional cash every month because you’ve got
high quality content. If you want to know how
to make extra $$$, search for: Ercannou’s essential adsense alternative